Introduction
Welcome to this guide on how to install Windows 10 alongside Arch Linux on a dual drive configuration with dual boot. If you’re someone who needs to use both operating systems for different purposes, or just want to explore the features of each, then you’ve come to the right place.
In this guide, we’ll assume that you already have Arch Linux and Windows 10 installed on separate drives, and want to configure them to dual boot using GRUB. This guide is not intended to teach you how to install Arch Linux or Windows, but rather how to set up the dual boot configuration.
By the end of this guide, you’ll be able to easily switch between Arch Linux and Windows 10 without having to go through the hassle of constantly changing boot settings or physically swapping drives.
Disclaimer: Always backup important data when working on low level system settings. You never know what could go wrong! this guide should work for all Linux distros operating on GRUB bootloader, but i have only tried it on Arch, thus i put this title
Before you start
What is UEFI and LEGACY mode
Legacy and UEFI are two different modes of booting a computer. Legacy boot mode is the traditional way of booting a computer, where the system BIOS initializes the hardware and starts the boot process from the MBR (Master Boot Record) on the hard disk. On the other hand, UEFI (Unified Extensible Firmware Interface) is a newer booting mode that replaces the traditional BIOS and provides more advanced features and security.
The main difference between Legacy and UEFI boot modes is the way they initialize the system hardware and manage the boot process. Legacy mode uses the MBR partition scheme, which has a limit of 2.2TB disk size and only supports up to four primary partitions. UEFI mode, on the other hand, uses the GPT partition scheme, which can support larger disk sizes and up to 128 partitions.
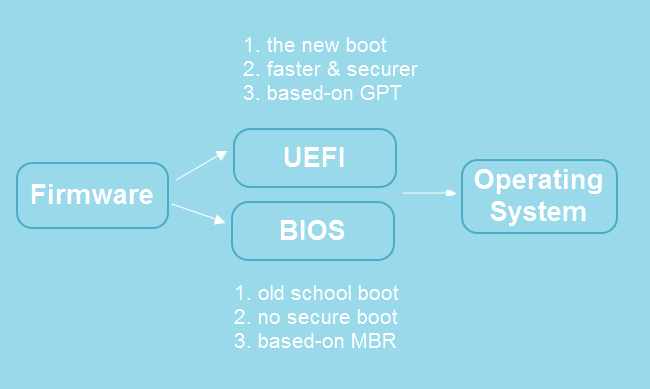
Another major difference is that UEFI firmware supports Secure Boot, which is a feature that ensures only trusted bootloaders and operating systems are loaded during the boot process, preventing malicious software from loading. Legacy boot mode does not support Secure Boot.
When it comes to bootloaders, some bootloaders work with UEFI, while others work with legacy mode. Bootloaders such as GRUB2, rEFInd, and systemd-boot are compatible with both UEFI and legacy mode. However, some older bootloaders like LILO and GRUB Legacy only work with legacy mode.
In summary, legacy and UEFI are two different boot modes that have different ways of initializing system hardware and managing the boot process. UEFI offers more advanced features and security, such as Secure Boot, and supports larger disk sizes and more partitions.
What is a bootloader
A bootloader is a small program that runs when a computer starts up and is responsible for loading the operating system into memory. It is usually located on the first sector of the hard disk and is loaded into memory by the BIOS (Basic Input/Output System) during the boot process.
One popular bootloader for Linux systems is GRUB (Grand Unified Bootloader). GRUB is a flexible and powerful bootloader that can boot multiple operating systems and can be configured to meet various requirements.
GRUB is open source software and is included with most Linux distributions. It supports a wide range of file systems, including ext2, ext3, ext4, Btrfs, XFS, and more. It also supports various boot options, such as booting in single-user mode or with specific kernel parameters.
One of the main features of GRUB is its menu interface, which allows users to choose which operating system or kernel to boot. This menu can be customized with different themes and can also include options for booting into recovery mode or running memory tests.
Another important feature of GRUB is its ability to load modules, which can extend its functionality. These modules can include additional file systems, support for encryption, or even custom boot screens
How to Setup the dual boot
If you’re here i suppose that:
- You’ve succesfully installed Arch Linux in one drive (let’s call it /dev/sdb)
- You’ve succesfully installed Windows in one drive (let’s call it /dev/sda)
- you’ve installed grub for your linux distro
As said before, GRUB is now your bootloader, but right now if you boot up your PC it will only show your linux distro.
To setup GRUB to also boot your windows partition you need to follow these steps.
1) Edit /etc/default/grub
/etc/default/grub is a file that contains configuration options for the GRUB boot loader. It contains various settings that determine how GRUB behaves, such as the default boot entry, the timeout for booting, and the resolution of the boot menu.
By modifying the options in /etc/default/grub, users can customize the behavior of the GRUB boot loader, such as changing the default boot entry or adding kernel parameters. However, it’s important to be cautious when making changes to this file, as incorrect settings can prevent the system from booting correctly.
Let’s go on editing the file:
sudo nano /etc/default/grublet’s find the row that states “GRUB_DISABLE_OS_PROBER” and we shall remove the comment
From:
#GRUB_DISABLE_OS_PROBER=falseTo:
GRUB_DISABLE_OS_PROBER=false2) Install os-prober tool
Depending on your Distro you should now install the tool “os-prober”
os-prober is a tool used to detect and report other operating systems installed on a computer’s hard drive. It is often used in conjunction with the GRUB bootloader to generate a menu of available operating systems during system startup.
The steps to install os-prober can vary depending on the Linux distribution you are using. Here are the instructions for a few popular distributions:
Ubuntu, Debian, and their derivatives
- Open the terminal.
- Run the following command:
sudo apt-get update - Run the following command to install
os-prober:sudo apt-get install os-prober
Fedora, CentOS, and RHEL
- Open the terminal.
- Run the following command to install
os-prober:sudo dnf install os-prober
Arch Linux
- Open the terminal.
- Run the following command to install
os-prober:sudo pacman -S os-prober
3) Mount windows partition
what you need to do now is mounting the windows boot partition.
To find out what’s yours you should run the command
lsblkin our case we have the boot partition in /dev/sda1 (windows partition is /dev/sda but the boot partition is /dev/sda1)
To mound it:
sudo mkdir /mnt/win10
mount /dev/sda1 /mnt/win10
4)Generating new grub.cfg
Even if you’ve probably already generated a grub.cfg file, we need now to generate a new one.
Run the following command:
sudo grub-mkconfig -o /boot/grub/grub.cfgafter sending this command you should see some output, in between those lines one should appeare that says something like “Found Windows Boot Manager at … “
5) reboot
reboot your system and you should be ready to go!
Conclusion
Congratulations, after following these steps your system should be ready to work with a GRUB configuration that allows dual boot!