
Disclaimer
This guide is a piece of an old project (2017-2018), which means that some of its content may be OUTDATED. This does not imply that everything written down here is trash or not working.
If you have any troubles or if you have any improvements, leave a comment.
Introduction
OpenVPN is an open source program used to create secure point-to-point encrypted tunnels between two computers over an insecure network, typically the internet. Allow hosts to authenticate with each other by means of shared keys (Pre Shared Key), digital certificates or username/password credentials.
It operates on port 1194
OpenVPN offers two types of network interface using the TUN/TAP driver:
1) TUN:
it is able to simulate a point-to-point type network device and works with
IP-type packets. When we send data on these interfaces the VPN takes the original packet
and encapsulates it in another encrypted packet in which the starting and destination IP
they are no longer those of the tunnel, but those of the remote and local physical interfaces.
They require configuration of both server and client side routing routes because the
networks at the ends of the tunnel are different, but have the advantage of not being vehicular
broadcast traffic on the tunnel
2) TAP:
is able to simulate an Ethernet device and logically uses frames
Ethernet. When a client connects in bridged mode to a remote network it must
have an IP address that belongs to the remote network, as if it were connected
locally.
Configuration modes
- OpenVPN can operate in two main modes:
- Site to Site
- Remote Access
Site – to – Site
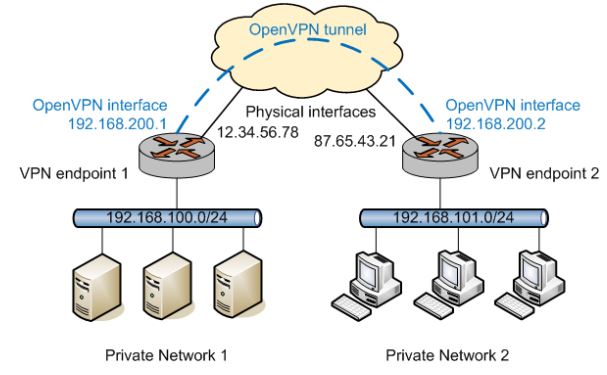
In site-to-site mode, a single host can
establish multiple OpenVPN tunnels, each of them
it can be for separate sites. Even if all the
tunnels come from a single interface
physics, each tunnel is represented by a
different IP address of the tunnel interface e
operates independently.
It is a configuration used to connect
entire networks virtually to each other
Remote Access Mode
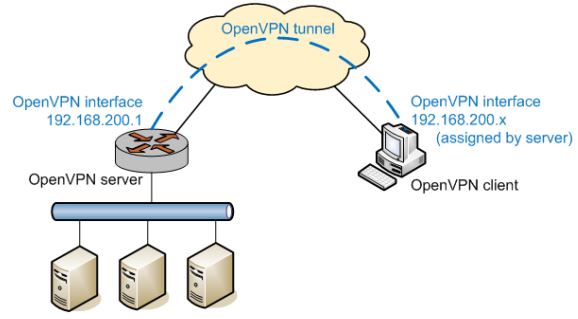
In Remote Access mode the client-server paradigm. Indeed, a host does will connect to the endpoint by establishing a secure connection to get access to network resources. each client has an independent tunnel that connect to the server
Authentication Methods
OpenVPN has two ways to authenticate:
- Static Key = A pre-shared key is generated and shared between the two peers
OpenVPN before starting the tunnel. This static key contains 4 independent keys : HMAC-Send, HMAC-Receive, encryption and decryption. By default settings, in static key mode, both hosts will use the same key HMAC and the same encryption / decryption key. - SSL/TLS = An SSL session with two-way authentication is established. If SSL/TLS authentication is successful, the key source material of encryption/decryption and HMAC is then randomly generated by the function RAND_bytes of OpenSSL and exchanged over the SSL/TLS connection. Both sides of the connection provide random source material. This mode does not ever use any bi-directional key, so each peer has its own HMAC-Send, HMAC-Receive, and its own encryption and decryption key.
Static Key Setting
The follow up steps are used to use a static key as auth method for the VPN:
1) Generate the Key
by using the command
openvpn --genkey --secret static.keyyou will be generating a static key that must be available on both client and server so you have to transfer it with a secure channel (or physically with USB or with SCP)
2) Configuring Server
the server file is located at
/etc/openvpn/server.confand we want to configure it this way
local [ADDRESS WHERE WE WANT TO ACCEPT REQUESTS]
dev tun
proto udp
port 1194
ifconfig [IP TUNNEL SERVER] [IP TUNNEL CLIENT]
secret [GENERATED STATIC KEY PATH]
push "route [LOCAL SERVER SUBNET] [MASK]"
persist-tun
persist-key
cipher AES-256-CBC
verb 6
log [LOG FILE]
3) Activating and enabling the server
At this point you need to know that the service should be started with Systemd, so:
systemctl start openvpn@server.conf
systemctl enable openvpn@server.conf
4) Setting up the Client
the server conf file is located at
/etc/openvpn/client.confand here is the configuration file content as should be set
remote [REAL REMOTE SERVER ADDRESS]
dev tun
proto udp
ifconfig [IP TUNNEL CLIENT] [IP TUNNEL SERVER]
route [SERVER PRIVATE SUBNET][MASK] [SERVER IP TUNNEL]
secret [STATIC KEY PATH]
persist-tun
persist-key
cipher AES-256-CBC
verb 6
log [LOG FILE]
5) Starting the Client
as before,
systemctl start openvpn@client
systemctl enable openvpn@client
6) Heading
We need now to define the routes and there are 2 options:
- define routes on the hosts of the network behind the server so that to reach the
client traffic is routed to the VPN server - perform a SNAT operation on the server so that clients receive packets of the VPN client with source ip replaced by the server’s
SSL-TLS Configuration method
pre requirements
cd /etc/openvpn
mkdir easy-rsa
apt-get install easy-rsa
cp -R /usr/share/easy-rsa/* easy-rsa/
echo -n '1' > /proc/sys/net/ipv4/ip_forward
1) Vars setup
Edit the file: /etc/openvpn/easy-rsa/vars according to your organization
2) Environment variables setup
cd easy-rsa/
mkdir keys
touch keys/index.txt
echo 01 > keys/serial
. ./vars ( in raspbian stretch this command will fail because it won't find “openssl.cnf”. Just create a symlink from the file openssl_1.0.0.cnf → ln -s openssl-1.0.0.cnf openssl.cnf )
./clean-all
3) Certification Authority
Execute the follwing command inside the easy-rsa folder to create the CA
./build-caThis command will generate public key (ca.crt) and private key (ca.key)
4) Generating Diffie Hellman parameters
./build-dhNote: Diffie hellman is a cryptographic protocol that allows two entities to establish a shared and secret key using an insecure (public) communication channel without the need for the two parties have exchanged information or met previously.”
5) Generate Server keys
./build-key-server server6) Generate keys for each client
./build-key-server clientname7) Key Copying
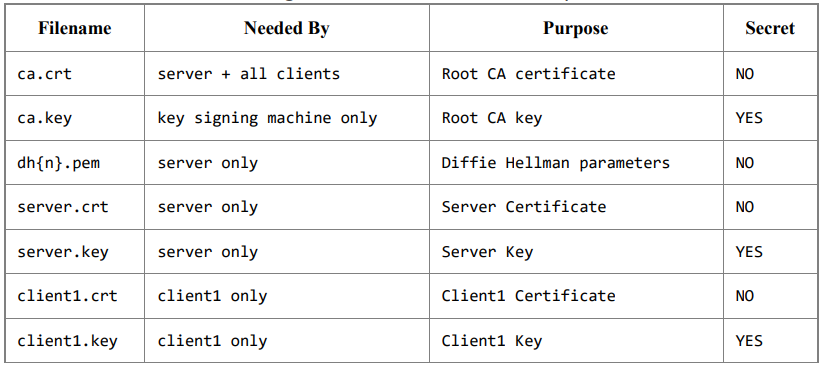
Copy the keys needed by the client(ca.crt, clientname.crt, clientname.key) into the directory
/etc/openvpn/easy-rsa/keys/
Following, a table summarizing all the keys and certificates with their purpose and usage
8) Server Configuration
The conf file is the same as before but this time the configuration is as follows:
local [INDIRIZZO SU CUI SI ACCETTANO CONNESSIONI]
port 1194
proto udp
dev tun

ca /etc/openvpn/easy-rsa/keys/ca.crt
cert /etc/openvpn/easy-rsa/keys/server.crt QUI VENGONO SPECIFICATE
key /etc/openvpn/easy-rsa/keys/server.key TUTTE LE CHIAVI E LE DIR
dh /etc/openvpn/easy-rsa/keys/dh[n].pem

server 172.28.0.0 255.255.255.0 [TUNNEL NETWORK SUBNET][MASK]
(This directive establishes that the machine will work in
 server mode and will acquire the first IP of the subnet. To the
 clients will be assigned other network addresses.)

ifconfig-pool-persist ipp.txt
(file where to record the correspondence between client and IP
 virtual assigned.)

push "route [SUBNET LOCAL NETWORK SERVER][MASK]"
(allows clients to reach other networks behind the server,
 obviously to make the communication bidirectional
 networks will need to be able to route to them in turn
 the address pool of the VPN)

client-config-dir /etc/openvpn/ccd
comp-lzo
cipher [CIPHER SET]
log [LOG FILES]
9) Activating Services
openvpn --config server.conf
systemctl start openvpn@server.conf
systemctl enable openvpn@server.conf
10) Configuring Client
Clients
dev tun
port 1194
udp protocol
remote [REAL IP OF THE ROUTER]

ca /etc/openvpn/easy-rsa/keys/ca.crt
cert /etc/openvpn/easy-rsa/keys/client1.crt
key /etc/openvpn/easy-rsa/keys/client1.key

nobind
persist-key
persist-tun
cipher [CIPHER SET]
11) Starting and enabling services
systemctl start openvpn@clientname
systemctl enable openvpn@clientname
12) Routing and NATting
To allow traffic on the TUN interface
- IPTABLES -A INPUT -i tun0 -j ACCEPT
- IPTABLES -A FORWARD -i tun0 -j ACCEPT
- IPTABLES -A OUTPUT -o tun0 -j ACCEPT

To allow forwarding only to the VPN
- IPTABLES -A FORWARD -i tun0 -o eth0 -s [SOURCE] -j ACCEPT
- IPTABLES -A FORWARD -m state --state ESTABLISHED,RELATED -j
 ACCEPT

To perform SNAT
- IPTABLES -t nat -A POSTROUTING -s [TUNNEL SOURCE] -o eth0 -j
 SNAT --to-source [SERVER'S IP IN LAN]